Wednesday, November 28, 2012

Giving new meaning to "You can quilt that out" - Christmas Quilt Show 2012


It's Christmas Quilt Show time!
 
I would like to thank Michelle Hester for taking over Sew Cal Gal's annual "Christmas Quilt Show" this year. Had she not done so, I have no doubt the project I am about to show would still, two years after I started it, be languishing forlornly on my UFO apple ladder, perhaps indefinitely.


Back in August, I decided to finish this project 1. For the 2012 Christmas season, 2. Because I was tired of feeling guilty about it being 75% done, and 3. For SewCalGal's show, since I didn't have anything else Christmas-y to show this year. Imagine my panic when I heard she was looking for someone else to take over. If there was no CQS, what reason would I have to finish it? Ever?

Finish it I did, about 20 minutes ago. I thank you all for not mentioning that I am late to the party. Here is my excuse: It may have been 75% done, but it still took me ALL of yesterday to finish quilting. Why?

Because I am famous for quilting the hell out of things.

More on that in a moment. For now, the particulars. This is a Sue Pelland design called "Christmas Ribbons" which I started two years ago when Sue came to my guild and taught her "Leaves Galore" quick curved applique shapes method with her cool rulers. The top was almost finished in class (I think I still had the flowers to do, but finished those the next day) and was so quick because it is a whole cloth applique design, no piecing required.

For the machine applique, I played with some of the fun stitches my machine will allow. Even the most basic machines usually have a few fun decorative stitches, and I am always encouraging my students to try new things with what they have and add some fun threads to boot; I'm also good at walking the walk.

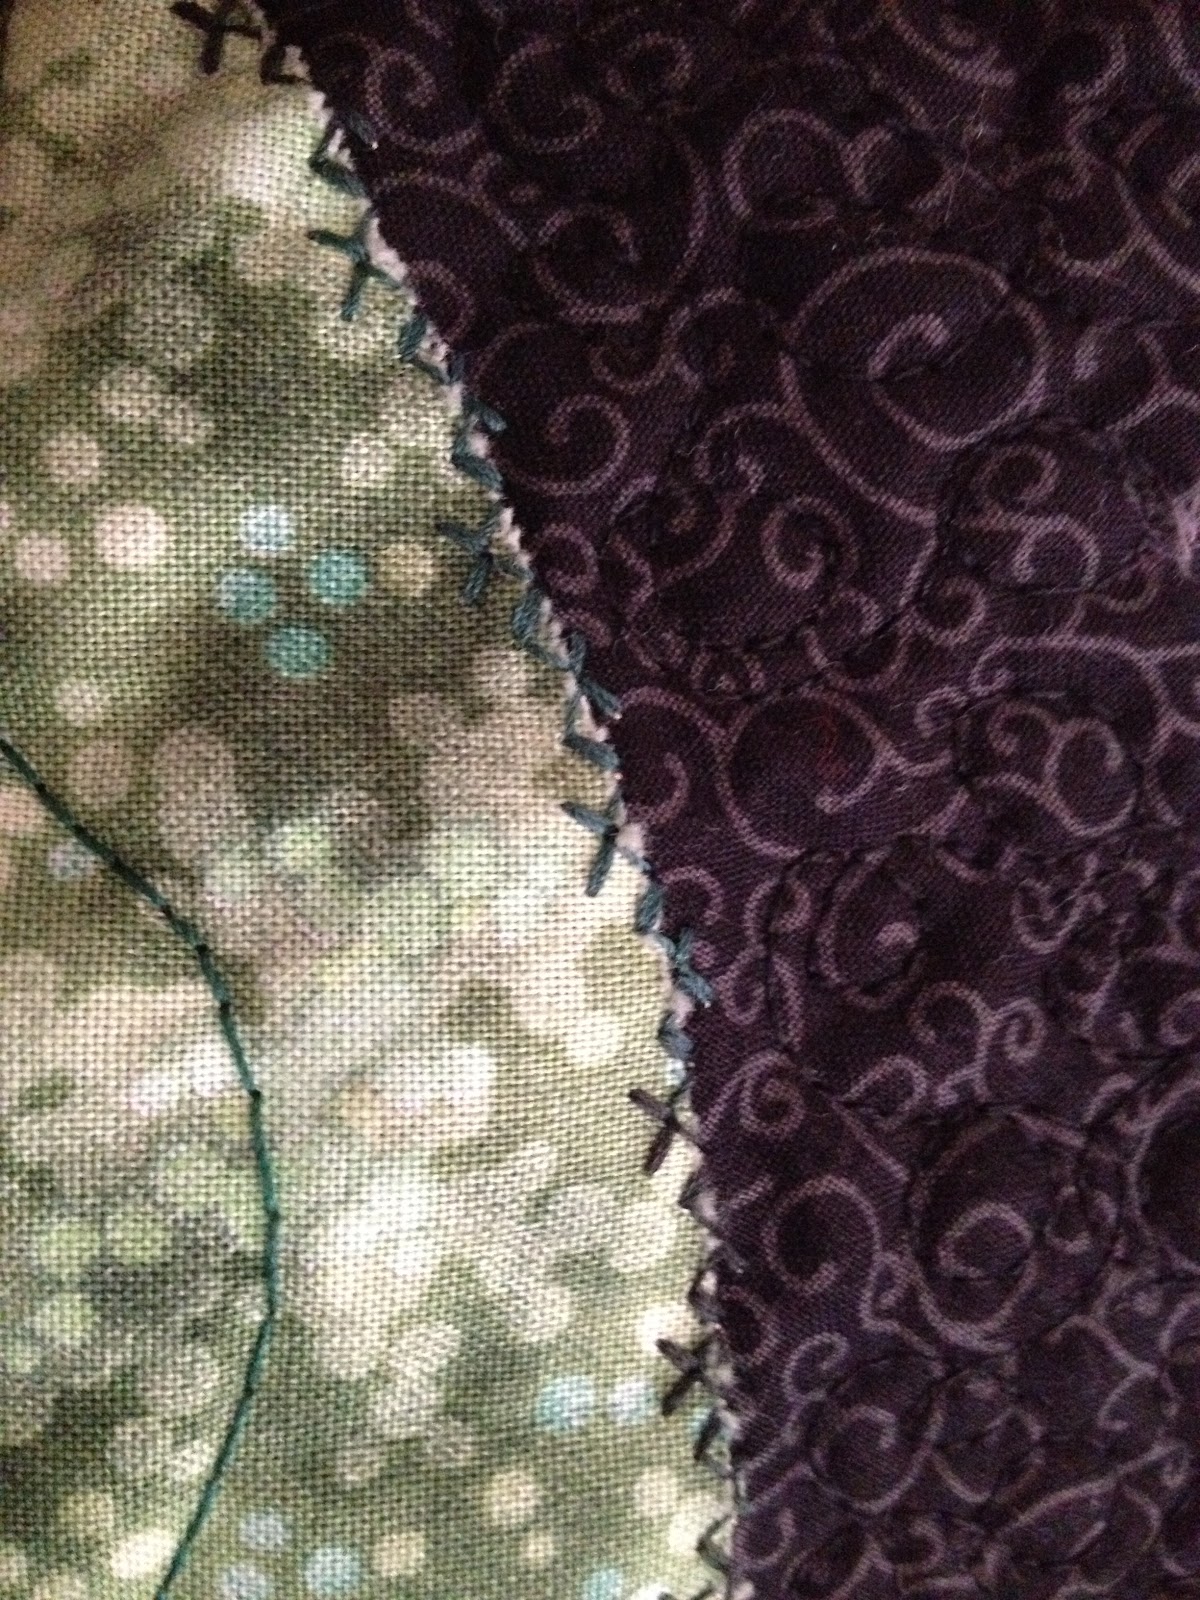
Some sort of funky stitch along the edge of the leaves using variegated dark green thread.


Another funky stitch along the ribbons, this time using a light pink metallic thread, and more than  likely some foul language while doing so. It was a while ago so I don't remember for sure, but I'm going on historical norms.

Satin stitch with hot pink thread for the poinsettias. There is no "t" in the first syllable of poinsettia. If you find my pointing that out obnoxious, be glad you are not FB friends with my sister the editor, who has been known to post a pre-Christmas card grammar lesson about the misuse of " 's " when signing your family's name. Not that I don't applaud it. 


So all of that decorative stitching was fun and adds a lot to the project. As you can see in the poinsettia photo, I also added a gathered tulle ribbon to the center. This serves to not only add some cool dimension and shimmer, but also covers up the awkwardness where all the petal points came together. I may or may not eventually add some jewels to this piece. Right now I really just am enjoying the fact that it is done enough to hang up.

The crowning glory of this piece is the quilting. I may or may not have gone completely insane, but in sandwiching the quilt, which was my first "wholecloth" style project, it was apparent to me that the whole thing was not going to lay flat unless I quilted it into submission. Fantastic. Let me just block off 35 hours to do so.

This photo shows my quilting, which is best described as "that crinkly look you get after you wash a quilt which has been quilted by a normal human being." It is as close as I will ever come to those crazy insane quilts in shows where people stand in front of them and go "LOOK AT THAT QUILTING! That must have taken her years!"

It did. Bow low to those ladies, hotties. This is about 32" x 46" and took me for. ever. The resulting quilt also weighs about 45 pounds and probably has enough thread on it to reach to the state line and back 6 times, and I am not even exaggerating. Keep in mind I am about 1 mile from the state line, but still.

I'm very proud of this finished project and I hope you enjoyed it. I invite you to let me know what you think, and also to make sure to check out all the other lovely entries in Christmas Quilt Show 2012!


Monday, November 26, 2012

I'm turning Cyber Monday into Cyber Week and don't try to stop me

My credit card is about to explode after a day spent rounding up deals and I'm sure it isn't over yet. Cyber Monday is the Holy Grail of Shopping for non-shoppers like me. Sit me down in front of the laptop with some tea and the ability to google, and the Christmas shopping comes together while Rouge the Elf on the Shelf looks on in wonder. This is how a real woman makes toys, you useless piece of holiday stress that on day two I have already had to leap out of bed at 4am to move because I forgot about you last night and I anticipate that will hardly be the last annoyance you cause me this season.

Not that I am bitter. Nor did I just go off on any sort of tangent.

So anyway, for those of you still doing a bit of shopping, EPQD has some Cyber Week deals going. If you have already heard about them, I apologize. I sent my newsletter peeps the info, and also posted on my EPQD FB page, but FB being FB has informed me they are having trouble with their promotions, so sadly I know it is not reaching all the people I was hoping to reach. If you have heard about the deals, stop reading and head on back to your shopping. If not, read on!

Hey, lookie here. I can cut and paste from CC. Who knew?

Cyber Week Rocks at EPQD!

All patterns in my Craftsy store - $5.00 now through Friday November 30.

GG
"Garden's Gate" by EvaPaige Quilt Designs, available on Craftsy.
Yeah, I can't get all the patterns I have designed onto Craftsy for reasons of general computer stupidity, but I did manage to get several of my top sellers on there to get you ready for days of winter sewing hibernation and all. Special price of $5.00 per pattern (a $2.50 savings) all through Cyber Week.

$5.00

Buy now at Craftsy!


So there. I've done all I can do to advertise these deals, and for someone who may never be fully comfortable with self-promotion, this is the best I can do. Feel free to share with all your quilty friends!

20% off all trunk show lectures - a $60 savings for your guild! 

head
All guilds initiating a lecture booking with Beth Helfter, EvaPaige Quilt Designs during Cyber Week (until 11:59pm 11/30) will be eligible to receive 20% off their lecture booking**.  Please include your guild name and location, desired booking date, and full contact information (name, address, email, phone) at time of inquiry; you will be sent a contract via email, which will need to be signed and returned by 12/15/12 to be fully contracted and ready for a fabulous day or evening of fun and inspiration!

**Lecture fees only, does not include travel or per diem expenses. EPQD will travel anywhere in the USA. 


Thursday, November 15, 2012

Guest blogging today!

So today I am guest blogging over at The Patchwork Pearl. Linda gave me the topic of "thankful" since it is November, the National Month of Thankfulness. I hope you'll visit us over there!

 Click here and be taken right on over. Look how easy I make it for you.


Wednesday, November 14, 2012

HTH Part 4 - ie The Big Finish

Here's hoping a few of you are still with me on this mystery project. I have no idea what may being going on because I have gotten zilch for feedback since it started. This could mean so many things:

1. My directions are perfect.
2. Everyone is so stunned by the fabulousness they have forgotten how to type.
3. Participants created their piles of scraps in part 1 and decided to build little towers with them instead of cutting them up.
4. No one is actually doing the mystery.

Whatever the reason, I do know you are still reading, so I hold out hope that maybe I'll get a photo of one or two finished runners!

When last we tearfully parted ways, you had created eight sets of blocks that look like this:

1. Find them.  As we have discussed, for some this will be an easier task than for others.
2. Sew them together into four sets of two, so that they look like "O"s with little squares in the middle. I'm not giving a photo of this step for the simple reason that I forgot to take one, and if you scroll down slightly you'll see the big reveal anyway.
3. Trim the four blocks you just made to 12 1/2" if necessary (the bias makes them stretchy, so you might need to square them slightly), and sew them together in one row of blocks, as if you are making a table runner.
4. Which you are totally making.
5. Press the seams between the blocks however you like. Since this is a one-row quilt, matching seams will not come into play, so it really doesn't matter what direction they are going.
6. Retrieve your longer border strips (ah ha! That is what you were making! As if you didn't know!) and sew them to the sides of the quilt.
7. Retrieve your shorter border strips and sew them to the top and bottom of the quilt.
8. Ta-dah!


I know, there are like seventy-eight different things wrong about this photo; it's a weird angle, there is no binding on the quilt, etc. But with luck you get what I want you to do. My quilt measures about 19" x 55", so it takes up much of the table length, which I enjoy until the moment my husband decides to spill red wine at dinner. At that moment I always contemplate the practicality of my hobby.

But it IS quilted. Which leads us to step 9, everyone's three favorite little words, Quilt As Desired.

Now, before you go getting all shaky and nutso because you never know what to do when instructed to QAD, let's revisit this phrase: "until my husband decides to spill red wine." Hotties, this is a table runner. The likelihood that if you use it as it was intended it will stay as pristine as this moment is approximately negative 36. Therefore, there is no need to quilt it like you are vying for the blue ribbon at the LeSueur county fair (shout out to the inlaws!), just stipple it and be done.

I of course did not take my own advice, and got a little fancier. But I'm a rebel.


So there you have it. A quickie quilt project - DONE! What did you think? I have my own thoughts, but would love to hear yours. Really I would. Just warn me if I need to open a bottle of wine first to dull the pain before you let them rip.


Wednesday, November 7, 2012

HTH Part 3

Wowsa, it's been a crazy week for me, but I can't let that stop me from getting this next set of mystery clues out on time. I've already shocked one participant, (name hint - she enjoys lin-ing her quilts with pearls) by actually getting the last clues up on time and in doing so foiling all of her plans to rag on me for being late. I can be impressive when I need to be.

So when we last parted ways, you had all sorts of strips littering your sewing table. Or maybe you are one of THOSE quilters who has a place for everything and everything in its place in your immaculate quilting studio. Just so you know, the rest of us find you kind of annoying, but good for you.

1. Wherever your strips are, find them. To review, they will look something like this:

but probably in different colors unless you are being a copycat. By which I of course mean I am flattered.

2. Cut the two A/B/A fabric strips (the green/red/green ones in my sample) to 48 1/2" long.

3. Cut the B/A/B fabric strip (red/green/red) into two strips 19 1/2" long. Set all those strips aside again wherever you were keeping them before.

4. Now retrieve your four pieced scrappy strips, which you marked down the center in the last set of clues. If you forgot to do so, do it now. We'll all wait while you catch up. I'll be over here marking you as "Needs Improvement" in the "Is Prepared for Class" category of your report card.

5. Place your 6 1/2" square ruler on the strip as shown, making sure that both the top and bottom points of the ruler are on the drawn line, and that the right-hand point of the ruler is on the little strippy that you placed on the right-hand side. Cut out the square carefully. You may need to walk around your cutting mat a bit to get all the sides easily. That is okay. A little exercise is good. I prefer that to you cutting yourself and suing me for damages.
6. Slide your ruler down and cut the next square in the same way. Repeat until you have cut 16 squares total, four from each of the four strips.
7. At which point your pile of blocks will look like this, but times 4. Be careful with these blocks as they are all bias. I promise that will come in handy for some of you in the next step.
8. Sew blocks together as shown, in eight sets of two. Because of the bias edges, the blocks will stretch a tiny bit if you need them to to get some decent point matching. Let me reiterate how much I could not care less if you actually match your points, but getting fairly close is probably a good idea for this design. Press each block as shown.

9. And you are done for the week. We'll finish it up next week; feel free to try to figure out what I have in mind. It really isn't rocket science and I imagine some of you might come up with something better than I did.


Monday, November 5, 2012

Gathering swag at The Gathering

Top 5 Excitements from The Gathering 2012

 1. My designers cooperative was able to secure a vending booth this year, which made the show extra crazy nutty for us but we are hardly complaining. The new location allowed for some newbies like us to get in; had they stayed at the old location, we would have continued to have to wait for someone to die before there was room for us. Not only was it great in that we could get in, but the layout for the show, raffle quilts, vendors, etc was all so much better than any other quilt show I have attended in this location. Kudos to Kate and Sarah, Gathering Hotties.
Partial view of our teeny tiny booth which we made gorgeous.

2.  Our across the aisle neighbors, Heart in Hands Quilt Shop from Weymouth MA, were as hilarious as we were, plus I "revolutionized" the beading process for one of the owners with my intensive 6 second Jewel-it demo. I highly recommend visiting their shop. It has to be beautiful based on their booth. And it has to be an extremely entertaining place to be based on their staff.

3. This was my favorite part of the actual quilt show, which apparently trumped all other parts of the show so much so that it is the only thing I took photos of, and then only two photos so I didn't even get the whole thing. I'm so professional. But really, it was just so cool who needs photos of anything else?

 I'm not sure why I can't put these two photos side by side, but by now none of you should be surprised by the almost post-ly glimpses into my technological inadequacies. But I will explain the best I can what this was all about. All of the Nationally Certified Judges worked on this project as a group (now you see one reason why I loved it) from their various homes and studios all over the country. They were each to create a quilt with a "line" going left to right in their design, and the line had to start and end with colors that were assigned to them in an exact spot along the edge, so that when the quilts were all hung next to each other they would form a big long line of connecting color. Example, the first quilt in the line had to start with yellow and end with yellow-green. Whatever happened in between was fine.


 As you can see in these two pictures, every participant had a different interpretation of "line" and everyone had such different styles  - the whole thing just was the coolest display ever. I found myself thinking it would make a fantastic guild challenge, but the biggest problem would be you would need to assure no one dropped out or the line would be lost, and I'm not sure that is possible in most guilds.


 4. Several brushes with hottie greatness were just way too much fun for me. Amy Lindsay stopped by to pick up her "Funky Tree Farm" kit that she won right here a few weeks ago. Marianne Nowacki (Hillside Quiltworks) was perusing our booth when she glanced at me, saw my name tag and outed herself as a follower of the blog with "I follow your blog - you are a NUT!" I had to bedeck her with a Quilting Hottie pin immediately. It turns out she also participated in the "Kickin' Stash" group quilt, so we spent a few moments looking for her block. I was relieved when we found it so that she would know I really did include them all and I hadn't just thrown hers in the trash or some such horror. Danielle Pelletier stopped by with many friends and stole me away to use me as show and tell while she sang the praises of "Syncopated Ribbons" to another vendor. She also was very excited to show me all of her thread purchases, and I only hope she isn't missing any as I may have dropped one or two when she was trying to fit all 87 spools she had purchased into my hands at once. I also enjoyed a lunchtime chat with Marianne Hatton, a designer and author who has the nicest most soothing voice and accent one could ever hope to listen to, and she made my day by knowing who I was even though I am a gnat compared to her giraffe in this business. We may even become besties since she stopped by the next day to ask my advice about starting a business Facebook page. It was all a little bit fun indeed.

5. I got mega-swag, both for the "Drop and Give Me Twenty" event in February and in the mail, and because I do now and then open my own wallet and buy some stuff, I did that too. There are just no words for how excited I am to start sewing with all the cool new stuff I bought/was gifted this weekend.

First, when I returned home from the first day of the show a package from Northcott had arrived with fabrics for a new design I am about to start sewing. They are so luscious I could eat them.

Second, thanks to a response to a panicked email I sent to my friend Jen Eskridge (Reanna Lily Designs) wherein I promised I was about to lose my mind if she didn't tell me how to make perfect circles with fabric, I found a ruler which is about to change my design life. Provided, as Jen cautioned, I remember to clear off my table entirely before using it. Otherwise it's just going to change the location of piles of fabric from my cutting table to the floor.

 Check out this thread. It's going to be amazing on this project. Metallic green and copper.

 And finally, for another project I have in mind, I am sorry, but is this not the most perfect mermaid hair ever?


Back to reality and heading down to chop up my luscious fabric right now!
Related Posts Plugin for WordPress, Blogger...